Providing you have programming experience of some kind, you can go some way towards getting to grips with Object Oriented Android by familiarising yourself with the basic principles we'll introduce in this article. Along the way we'll hopefully demystify some potentially confusing language you may have come across on the topic.
Classes and Objects
Object Oriented development essentially means dividing up the processing tasks in an application between a group of objects. Developers begin designing such applications by defining these objects at an abstract level, assigning the various responsibilities required by the app. To implement objects in code, you create class declarations.
A class declaration is normally a single file in a Java project, in which you declare the properties and behaviour that objects of the class will provide. Think of a class declaration as a description of an object in general terms. Once an app has a class declaration, other code within the application can create objects of the class, each of which will match the description outlined in the declaration, but with differences in terms of data.
The following Java code demonstrates a simple class declaration for illustration:
public class Worker {
  //instance variable
 private String name;

  //constructor method
 public Worker(String workerName) {
  name=workerName;
 }

  //method to return name
 public String getName() { return name; }
}
Using Objects
Code external to the class, for example within another Java file in the application package, can instantiate objects of this class as follows:
Worker adminHelper = new Worker("Jim");
Worker managementHelper = new Worker("Mary");
This code declares and instantiates two Worker object variables. Stating the name and type of an object is declaring it. Creating an instance of the class and assigning this to the object variable is instantiation. Although these two objects are of the same class, they have different data, in this case simply the string name variable.
When this code executes, Java runs the constructor method within the class declaration. Within the constructor, the code assigns a value to the one class instance variable with the string value passed as a parameter when creating the new object. Once the "customer" code has an object of the class, it can call any public methods in it as follows:
String adminName = adminHelper.getName();
The "getName" method returns the string instance variable. Public methods and variables can be accessed outside the class, while private resources, such as the instance variable, are only available inside the declaration.
These examples are for demonstration and are therefore abstract, we'll get to practical, Android-based examples next.
Android App Classes
If you've already started developing Android apps you will have created classes, although some of them may have a different structure to the example above. The Android platform does certain things slightly differently to the typical Java application, but the same patterns apply.
Your initial Android projects will likely have some Activity classes in them. Unlike a standard Java class, an Activity class is instantiated by the system when your code creates and starts an Intent object, rather than by using the "new" keyword as in the example above. To dictate what should happen when an Activity class is instantiated, you add code to the "onCreate" method rather than a constructor.
You can create standard Java classes to handle specific processing areas within your apps, as well as using the Android classes. When your apps use classes within the Android platform, such as the Activity class, they use inheritance.
Inheritance
If you have any existing Android projects in which you have Activity classes, you have already used inheritance. The class declaration for an Activity starts like this:
public class HelpSection extends Activity
The class name will vary for your own Activities. The phrase "extends Activity" means that the class is inheriting from the Android Activity class. When a Java class extends another class, it inherits the methods of that class. The parent class being extended is referred to as the superclass, with the extending class known as the subclass. The following sample code demonstrates extending the Worker class above:
public class Administrator extends Worker {

 public Administrator(String adminName) {
  super(adminName);
 }

}
The constructor method in the subclass calls the constructor for the superclass. This class can provide additional methods and variables that are specific to its own area of responsibility. Inheritance is essentially a way to re-use code, with extending classes able to make use of existing resources within an application or within the Java and Android platforms.
By extending the Android classes, your own classes inherit their functionality, saving you from having to implement certain details. For example, the Activity superclass handles the details of presenting a user interface screen to your users.
The inheritance structures you are most likely to use at first are for user interface elements, but you can extend any existing Java and Android classes you find useful. This is a key feature of Object Oriented development, and allows you to focus your energy on the aspects of your own projects that make them unique.
Overriding
An inheriting class can provide a dedicated implementation of any method in the superclass it is extending. If you provide a method in a subclass that is also in the superclass, this new version of the method overrides the superclass version. If you want to carry out the same processing as the superclass method and then additional processing of your own, you can begin the method implementation by first calling the implementation in the superclass as follows:
public void doSomething() {
super.doSomething();
//additional processing
}
Interfaces
As we have seen, with class declarations, you define the behaviour of object instances. Interfaces are another way to influence object behaviour. An interface in Java is like a contract, specifying a series of methods that implementing classes must provide.
Interface declarations list method signatures, each signature including the method name plus an indication of the parameters and return type. Interfaces do not provide implementation details for the methods, so the implementing classes need to do this. In other words, an interface dictates what the class will do, and the class declaration describes how it will do it.
Again, if you have already started with Android you may have implemented some interfaces. The Android platform provides a range of interfaces for delivering user interaction, such as the "OnClickListener" interface. You can indicate that a class will implement an interface using the following syntax:
public class HelpSection extends Activity implements OnClickListener
If you are programming in an Integrated Development Environment such as Eclipse, the program will display error messages when you initially add this code. This is one of the most useful aspects of an IDE, as it reminds you to provide the interface methods, and will continue to show errors until you do.
For the "OnClickListener" interface, your class must provide the "onClick" method, responding to user interaction with your Activity. Implementing an interface is therefore making a commitment that your class will exhibit certain generic behaviours. It's up to you to decide exactly how your classes implement them.
Developing in Eclipse
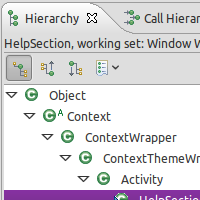
Eclipse is designed for developing Object Oriented projects, so it has a number of features you may find useful for your Android apps. The Type Hierarchy view helps to visualise projects with reference to the concepts we've gone over here. For example, if you have a class which is extending another class, you can see its hierarchy within your application, and within the platform as a whole.

To see the Type Hierarchy, open the view by choosing Window, Show View, Hierarchy. The new pane will appear within your Eclipse window. Choose an inheriting class in your application and right-click on a reference to the class name in one of your Java files, then choose Open Type Hierarchy. You should see the hierarchy presented within the new view. All classes in Java ultimately inherit from the class Object, so you will see it at the top of the hierarchy tree structure.
Conclusion
Through OO development, you can work with re-usable code components which preserve the ability to specialise in unique application areas. This is sometimes referred to as polymorphism. The model allows you to make use of a wealth of existing code resources within both the Java language and the Android platform itself.
Regardless of your development background, learning the basics of Object Oriented development needn't be a difficult task, and can have a hugely positive impact on your Android projects.
The OO model is often used by developers working in teams, who need to be able to use one another's code without having to understand the implementation details within any particular section. This idea of an application being made up of code excerpts, each of which has clearly defined behaviours, is the key one to understand, whether you're working with classes and interfaces from your own apps, from the Android platform or from the Java language itself.